
Demo
Overview
You can perform the following installation types with PDQ Deploy:
- Base version install - use this installation type when you are deploying idemeum client for the first time to a set of Windows workstations. You will need to use the .exe file for this installation.
- Upgrade version install - use this installation type when you already have idemeum desktop client installed, and you need to upgrade the client to a newer version. You will need to use the .msi file for this installation.
- Uninstall application - use this installation type when you need to remove idemeum desktop client from Windows workstations.
- Force update settings - use this installation when you need to update settings on Windows workstations. For example, when you update new background in idemeum cloud, it will be automatically applied to your workstations within 6 hours. However, if you need to update the settings right away, you can use this installation type to force update settings.
Prerequisites
Create client id and secret
- Navigate to your idemeum admin portal. Then click
Settings->Desktop MFA.
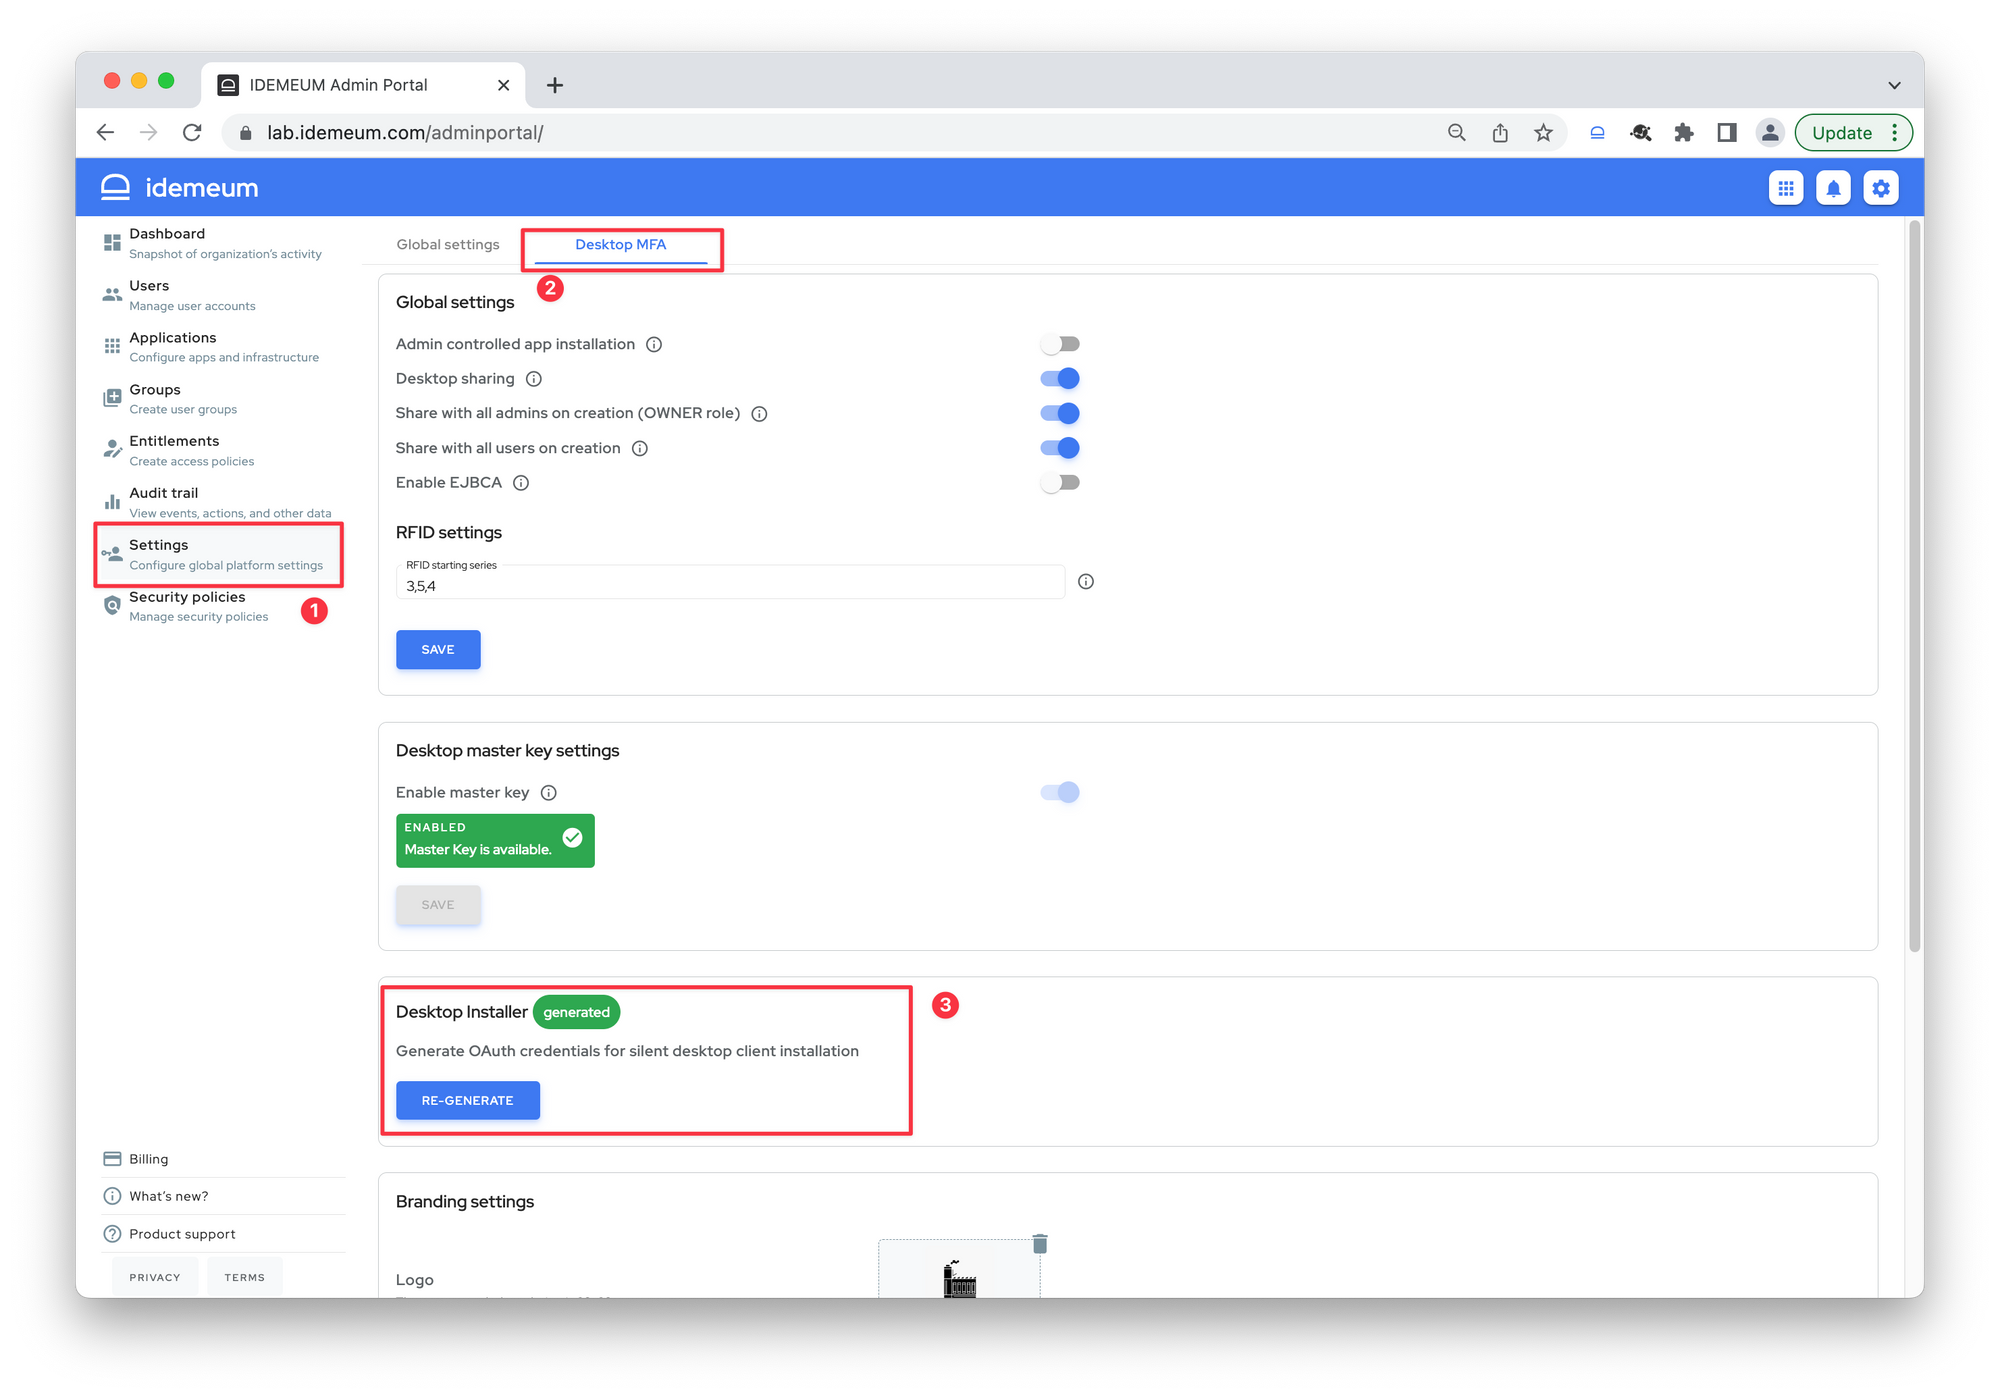
- In the
Desktop Installersection clickGENERATEto generate client id and client secret for silent installation
- Note down the client id and secret required for silent installation
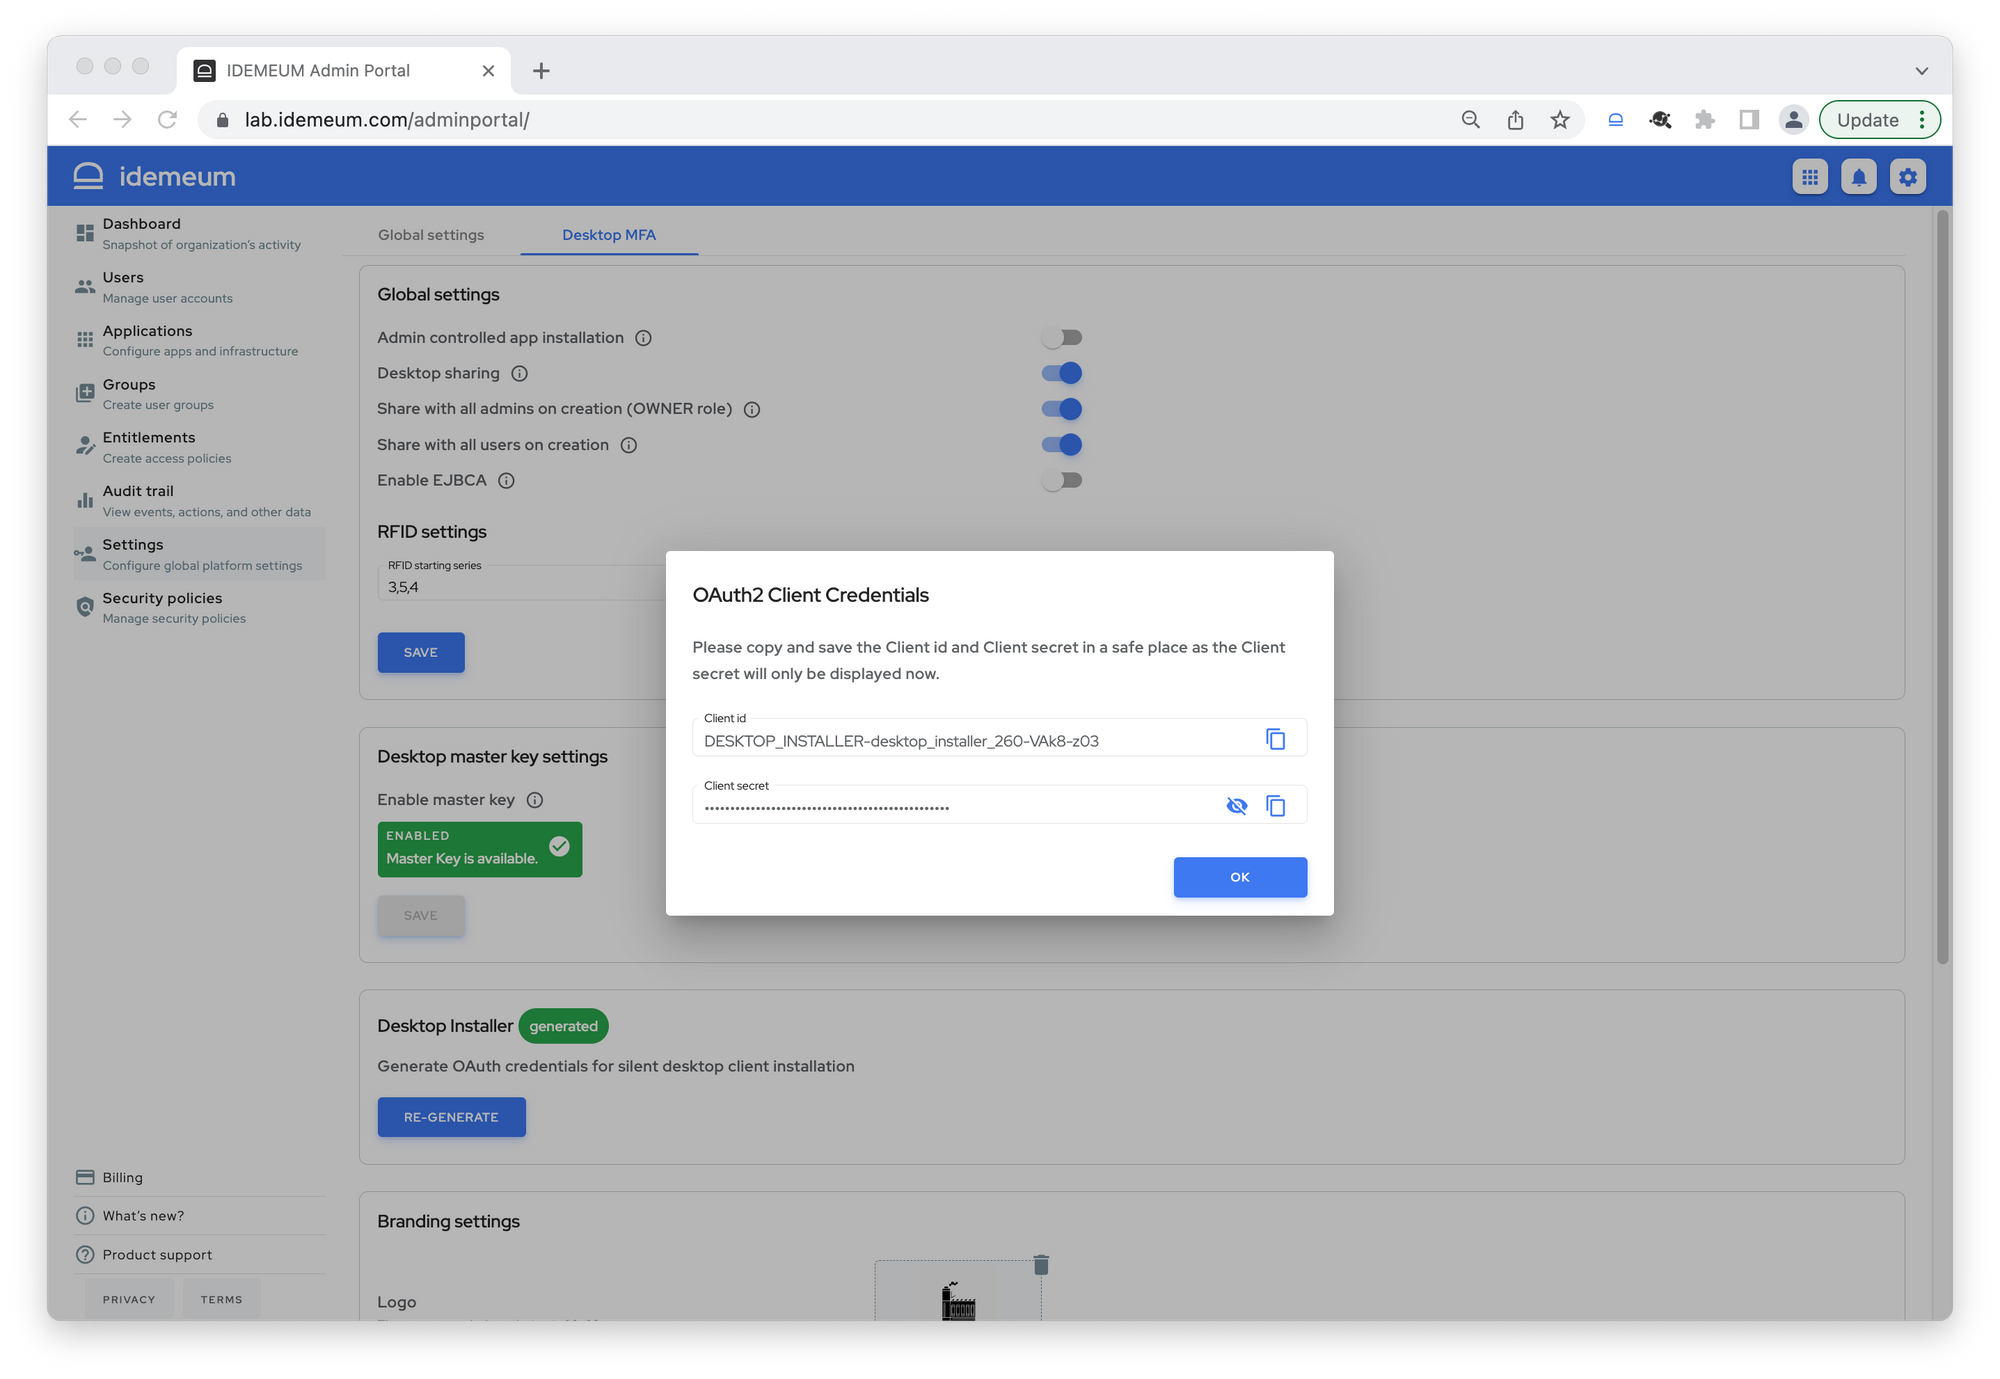
Enable desktop master key
Now we will also need to copy the master key. We will use the master key input for dekstop installation.
- Navigate to
Settings->Desktop MFA->Desktop Master Key - Enable the master key and copy the value, as you will need it for desktop installation
Base version install
Please follow the following steps to install idemeum desktop client to a fleet of Windows workstations.
- Navigate to idemeum documentation portal and download the latest idemeum desktop client
- Download the package (.xml) to your server where PDQ deploy is installed
- Import the package XML into PDQ deploy console - right-click on the
Packages-> ClickImport - Right-click on the package -> Click
Open - Provide the path to the downloaded idemeum client .exe file

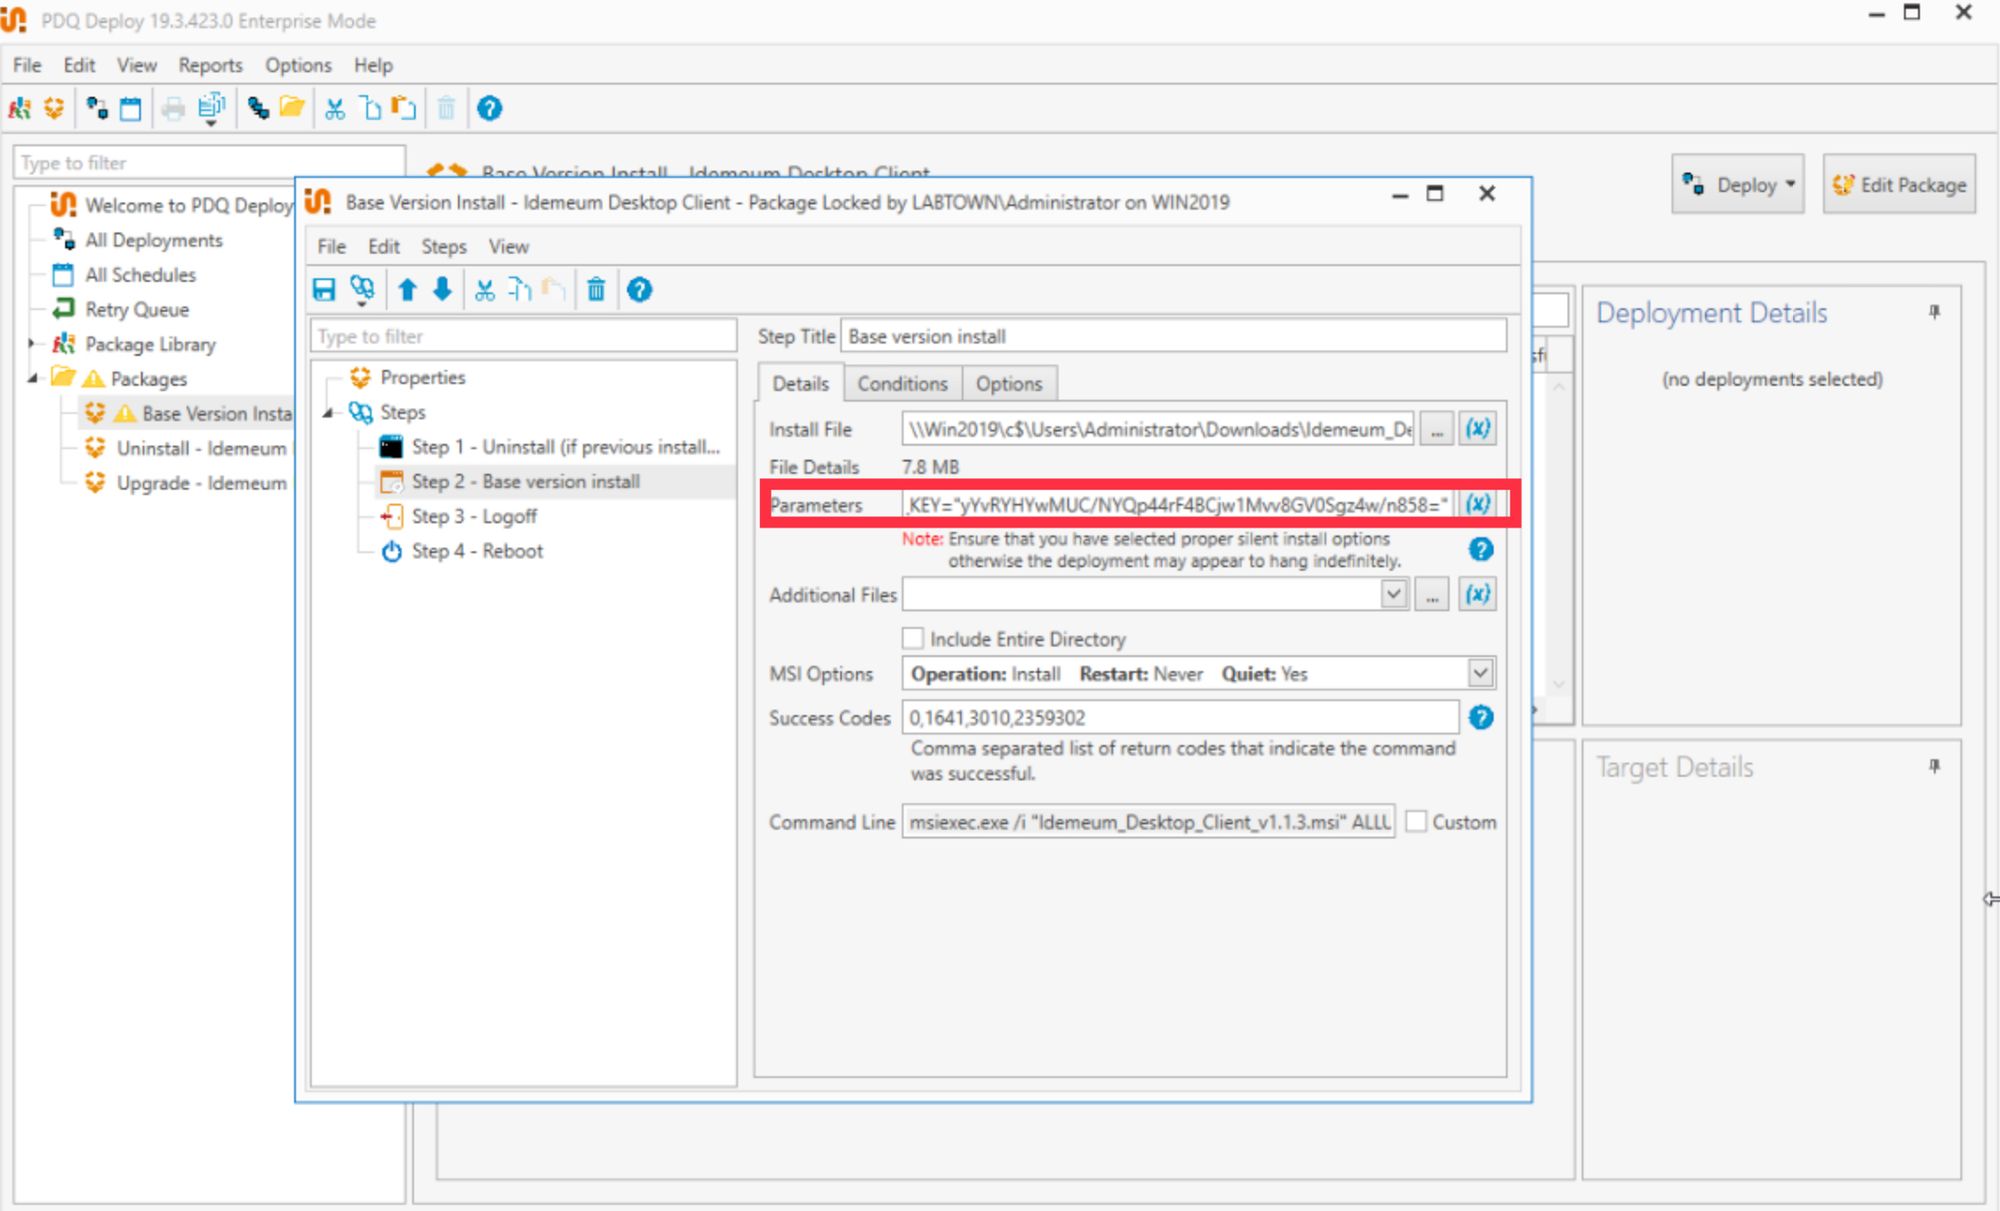
- In the PDQ deploy console, for the parameters section, enter the following after specifying your variables:
/exenoui /qn /norestart TENANTURL="<your tenant URL>" CORP_EMAIL="<your corporate email>" CLIENT_ID="<client ID>" CLIENT_SECRET="<secret>" AUTH_TYPE="<type>" TENANT_DISPLAY_NAME="<display name>" MASTER_KEY="<your encryption key" AUTOFILL_ENABLED=FALSE CREDENTIAL_PROVIDE_ENABLED=TRUEFor instance, here is how the command looks like for our testing tenant:
/exenoui /qn /norestart TENANTURL="https://lab.idemeum.com" CORP_EMAIL="nik@lab.town" CLIENT_ID="DESKTOP_INSTALLER-desktop_installer_261-VAk8-z03" CLIENT_SECRET="oxoN~L!z8Ukvz8!3i2k5E^3o~16L7Ldmbo-OUUr4FPDVgGvP" AUTH_TYPE="RFID" TENANT_DISPLAY_NAME="Manufacturing Company" MASTER_KEY="yYvRYHYwMUC/NYlp44rF4BCjw1Mvv8GV0Sgz4w/n858=" AUTOFILL_ENABLED=FALSE CREDENTIAL_PROVIDE_ENABLED=TRUE- TENANTURL - URL for your idemeum tenant, i.e
https://test.idemeum.com - CORP_EMAIL - (optional) Enter the email of the admin for which the current app needs to be assigned at the time of installation. If not mentioned, please ensure the knob Share with all admins on creation (OWNER role) is enabled in
Admin Portal->Settings->Desktop MFA. - CLIENT_ID and CLIENT_SECRET- enter the copied
client idandclient secretthat you generated in idemeum admin portal - AUTH_TYPE - it's either
RFIDorQRCODEbased on the login mode that you want to enable - TENANT_DISPLAY_NAME - tenant display name (i.e. Healthcare Company)
- MASTER_KEY - if you are using password applications and would like extension to auto login user when the badge is tapped, then you need to provide your encryption key that desktop application will use to locally encrypt / decrypt passwords. You can generate the key by navigating to idemeum admin portal ->
Settings->Desktop MFA->Desktop Master Key Settings - AUTOFILL_ENABLED - use only if you require credential autofill for desktop applications
- CREDENTIAL_PROVIDE_ENABLED - set to TRUE to enable login with RFID badge
- Click
Save - Now the package is saved, choose the desired target machines to which this package needs to be deployed to perform base version install via scheduled deploy or to
Deploy Once. Choose the package -> ClickDeploy
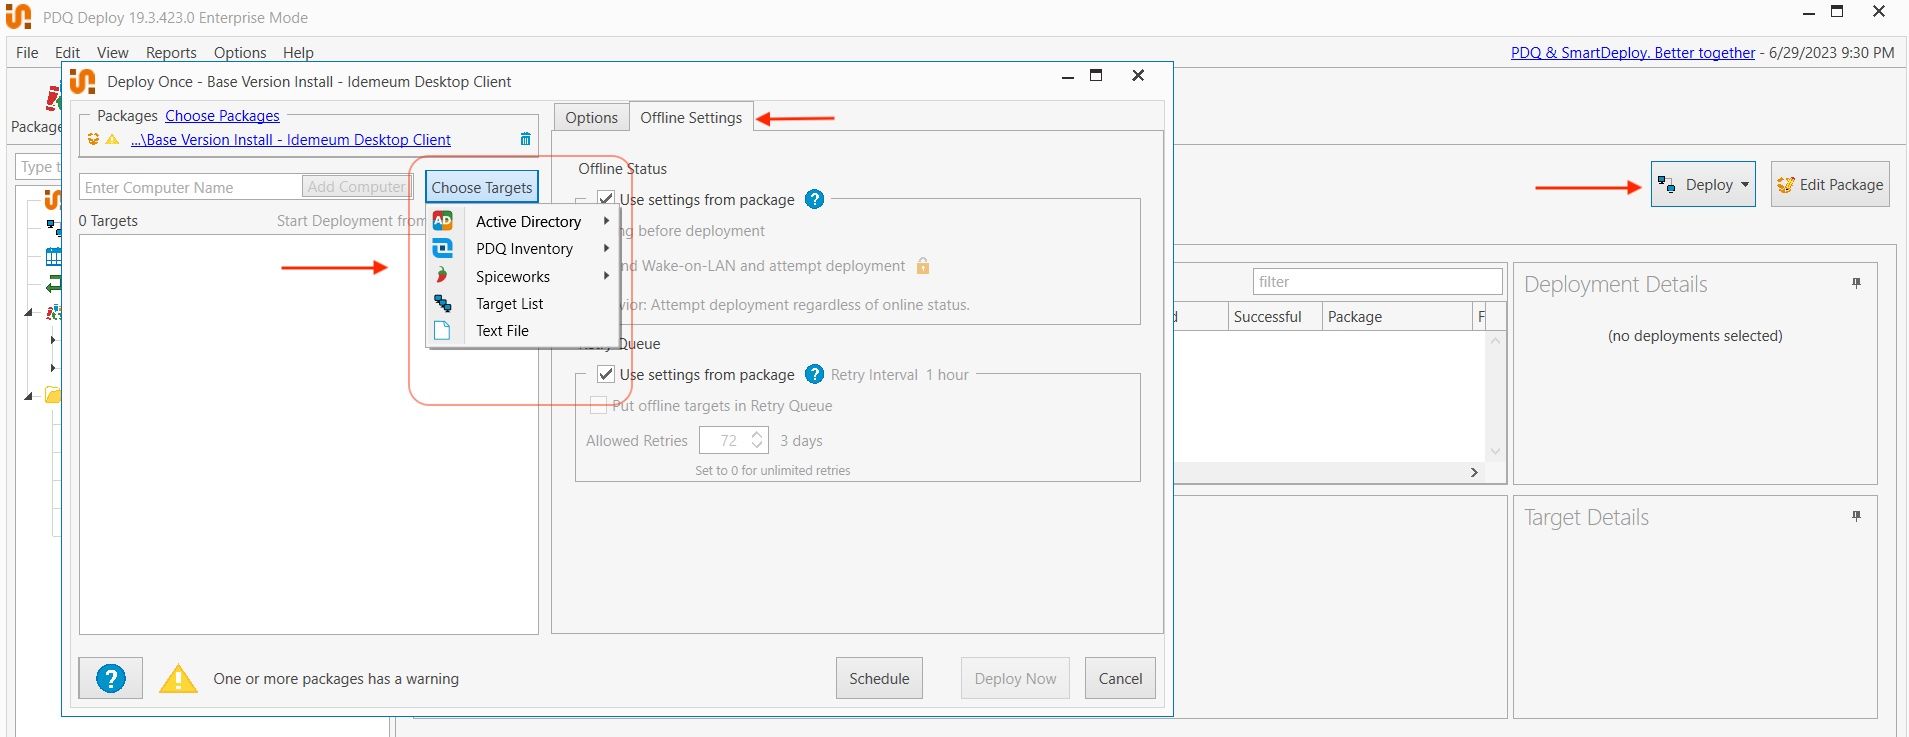
- Click
Choose Targets-> Select the desired target machines from any listed options per Org PDQ deploy settings. - For
Offline SettingsOrg can decide on the same based on per package or can utilize the Global settings fromPreferences. If you would like to customize at the package level, edit the package -> ClickProperties->Offline Settingstab - Click
Deploy Now
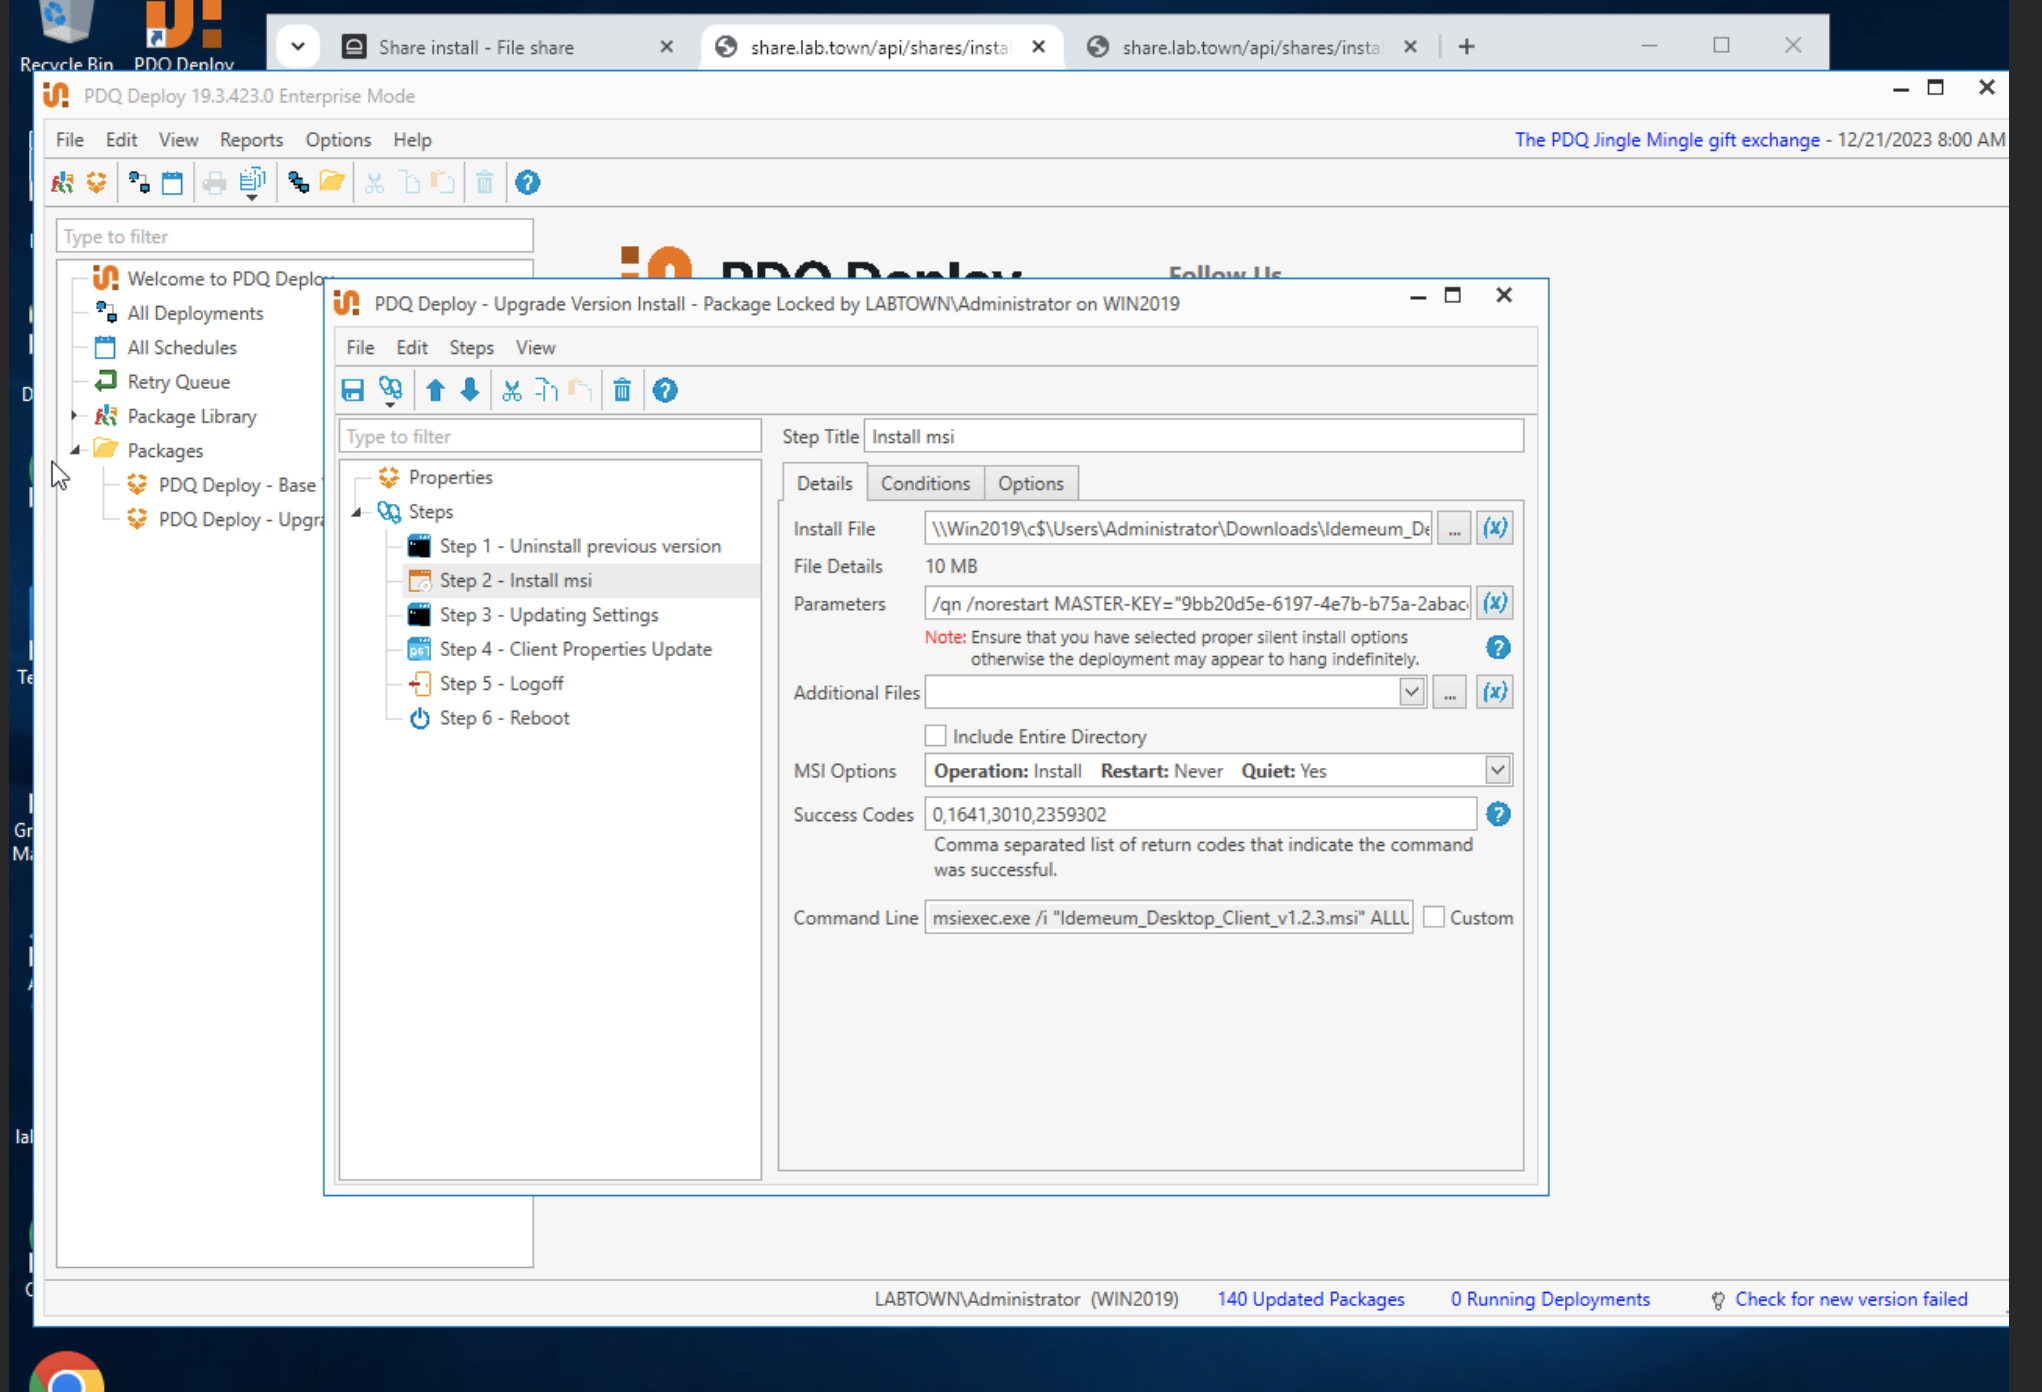
Upgrade version install
This installation type is used for desktop client upgrades. Once the base version is installed, you can use the steps below for all subsequent upgrades.
- Navigate to idemeum documentation portal and download the latest idemeum desktop client.
- Download the package (.xml) to your server where PDQ deploy is installed
- Import the package XML into PDQ deploy console - right-click on the
Packages-> ClickImport) - Right-click on the package -> Click
Open - Provide the path to the downloaded .msi file
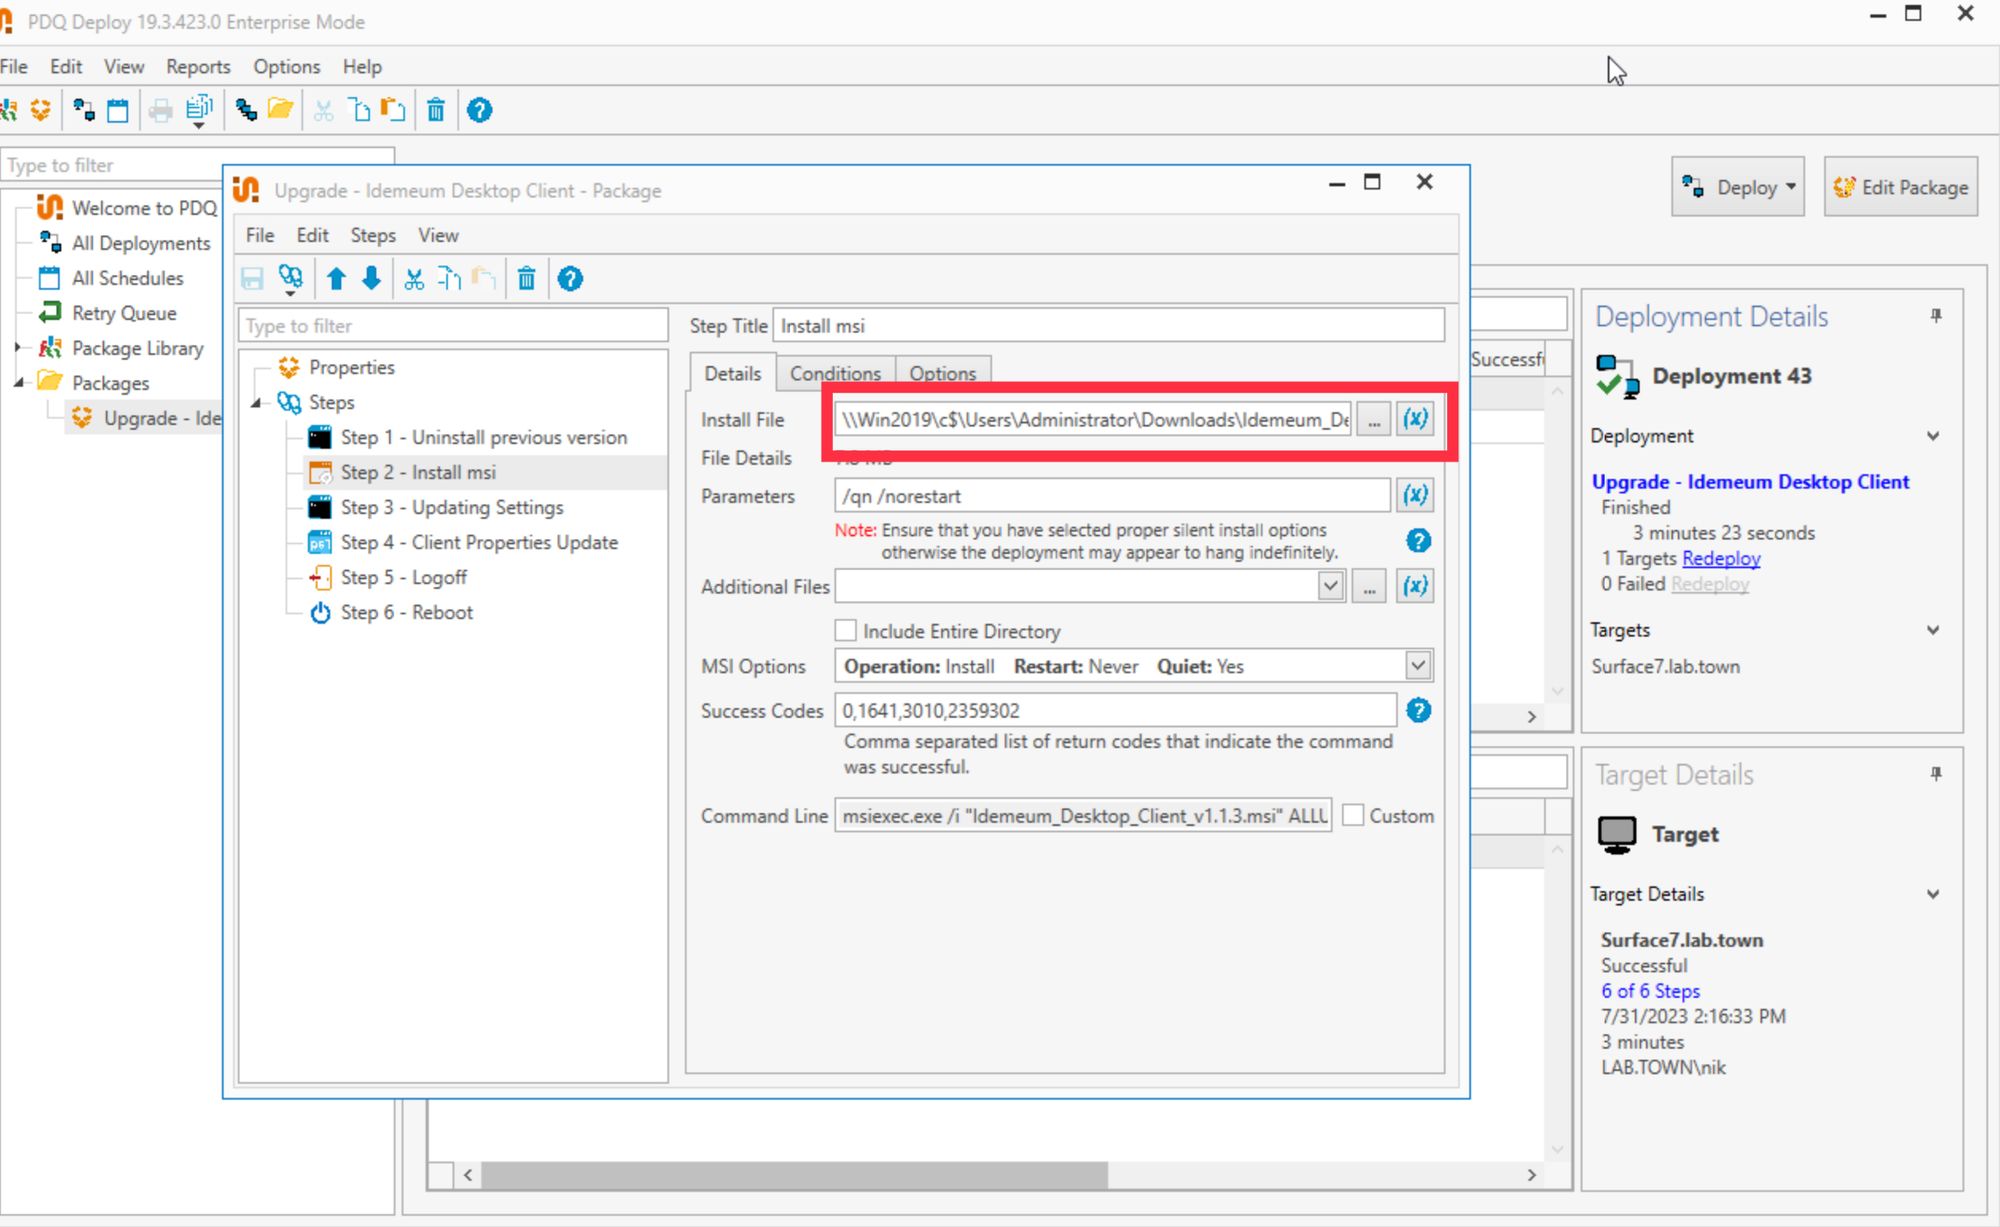
- Ensure MSI options are as shown in the screenshot below. (MSI options are auto-populated once the .msi file is chosen)
- Also make sure you enter your own master key in the parameters section
- Click
Save - Now the package is saved, choose the desired target machines to which this package needs to be deployed to perform the upgrade version install via scheduled deploy or to Deploy Once. Choose the package -> Click
Deploy
- Click
Choose Targets-> Select the desired target machines from any listed options per Org PDQ deploy settings. - For
Offline SettingsOrg can decide on the same based on per package or can utilize the Global settings fromPreferences. If you would like to customize at the package level, edit the package -> ClickProperties->Offline Settingstab - Click
Deploy Now
Uninstall application
Use this installation type to remove idemeum desktop client from selected Windows workstations.
- Download the package provided below
- Import the package XML into PDQ deploy console - right-click on the
Packages-> ClickImport) - To initiate idemeum desktop client removal from target machines select imported package -> Click
Deploy - Click
Choose Targets-> select the desired target machines from any listed options per Org PDQ deploy settings - Click
Deploy Now
Force update settings
Use this installation type to force update settings on your target workstations. For example, if you updated the background image for login screen, and you would like to have your workstation immediately reflect the change.
- Download the package provided below
- Import the package XML into PDQ deploy console - right-click on the
Packages-> ClickImport) - Deploy the imported package to initiate the force update process on the target machines. Choose the package -> Click
Deploy - Click
Choose Targets-> Select the desired target machines from any listed options per Org PDQ deploy settings. - Click
Deploy Now
