
Capabilities overview
Microsoft 365 / Office 365 is a subscription that comes with premium apps like Word, Excel, PowerPoint, OneNote, Outlook, Publisher, and Access.
| Supported capability | Required plan | Details |
|---|---|---|
| Passwordless SSO | Any plan | Low SSO tax |
| Automated provisioning | Any plan | API (create, remove, update accounts) |
| License management | Any plan | Assign licenses to newly created users |
| Password manager | Any | Auto-fill / Auto-capture |
Supported use cases
Office 365 uses the ImmutableID attribute to uniquely identify users. Each O365 user must have an ImmutableId, and the SAML Name ID attribute sent to O365 during SSO must be the same as the ImmutableId. When idemeum provisions users to O365 it takes care of creating unique ImmutableID for each user and mapping it to idemeum decentralized identifier (DID).
| Use case | Support |
|---|---|
| No users, new deployment | Supported |
| Existing users, created manually in admin console | Supported |
| Existing users, synced from Active Directory | Not supported |
Prerequisites
In order to integrate idemeum with Microsoft 365 you will first need to obtain SAML metadata parameters for your idemeum tenant.
Specifically you will need:
- Identity Provider SSO URL
- Identity Provider Entity ID
- Public X509 certificate
Instructions for how to obtain these SAML metadata parameters are below.
 idemeum team
Passwordless Single Sign-On (SAML)
Configure SSO in Microsoft 365
After signing up for Microsoft 365, the only domain associated with your account is the onmicrosoft.com subdomain chosen during registration (for example, contoso.onmicrosoft.com). To allow users to SSO to Azure AD and Microsoft 365, it is recommended to have another domain added to the environment. If you already have such domain added and verified, you can always use that.
Once you configure Azure AD domain to be federated, you will no longer be able to use local login into accounts associated with that domain. Therefore, if something is wrong with the configuration, you might lock yourself out. To prevent that, make sure you have admin account created on other domain (for instance on your onmicrosoft.com domain), so that you can always use that account to log in and revert federation configuration.
We will be using PowerShell to configure Azure AD domain for federation:
- Launch PowerShell on a Windows machine
- Install MSOnline PowerShell module if you have not already
Install-Module MSOnline- Connect to MSOnline service. You will need to authenticate with your Azure AD admin credentials
Connect-MsolService
- You can check your existing domains and their federation settings
Get-MsolDomain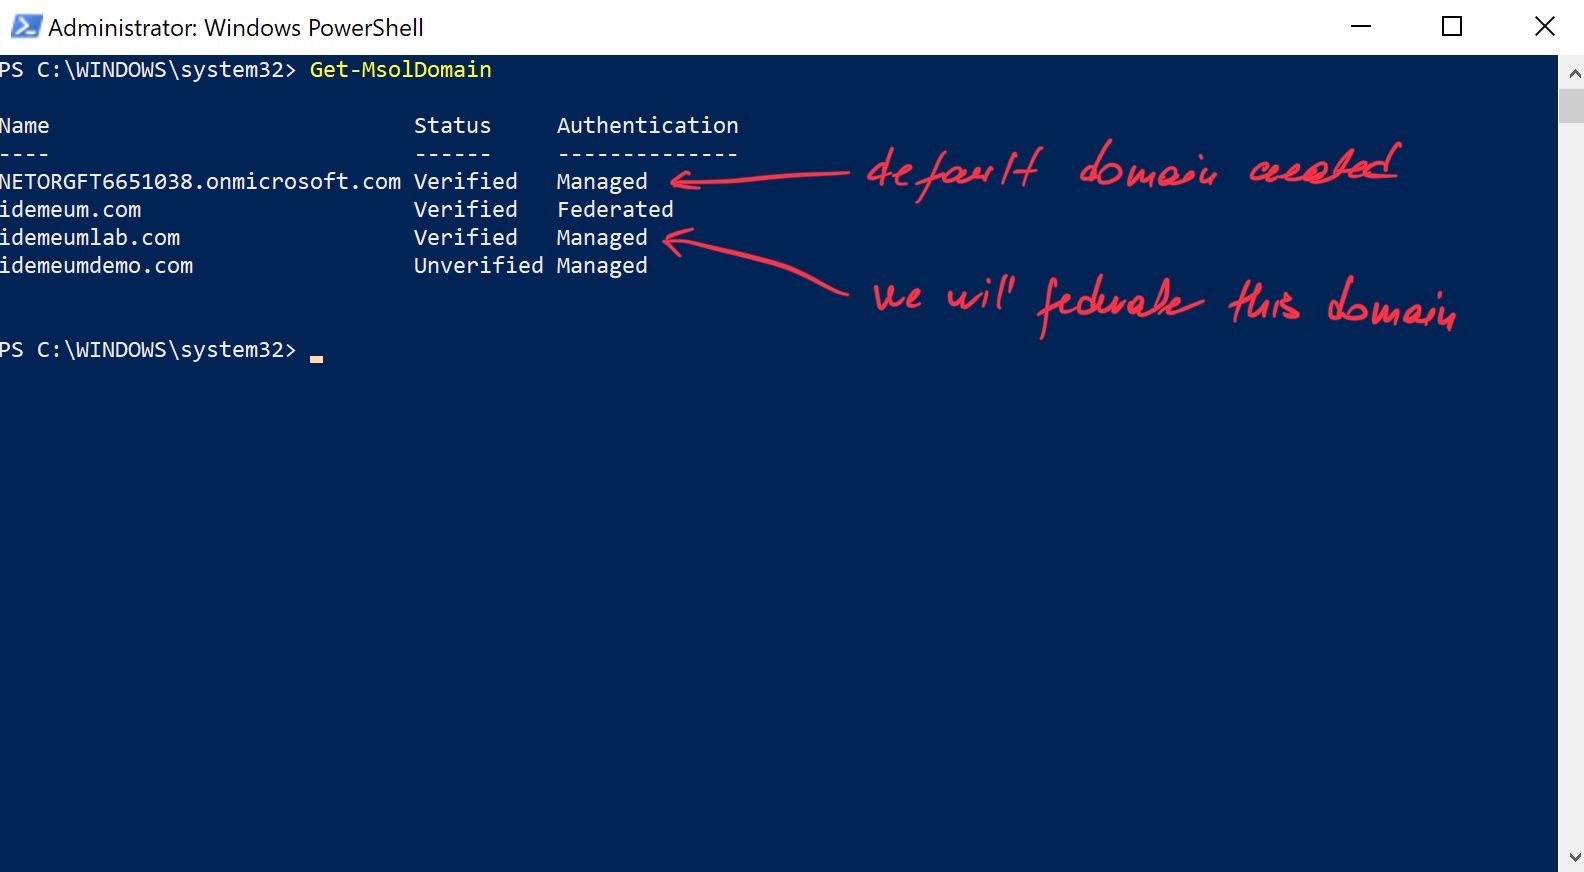
- If the current setting for your domain is federated, you will need to first convert domain back to managed setting. You can use the following command to revert it back to managed.
Set-MsolDomainAuthentication -DomainName <yourdomain> -Authentication managed- Now we will prepate the Powershell command to covert our desired MSFT domain to federated with necessary idemeum settings. We will be using parameters obtained in the prerequisites section. We will be using the following variables.
$Domain- the domain that you are planning to federate with idemeum$BrandName- the name that you will use for federation$LogOnUrl- this is an Identity Provider SSO URL that you obtained in the prerequisites section (e.g. https://demo.idemeumlab.com/saml/signon)$LogOffUrl- take your Identity Provider SSO URL and replace signon with slo at the end (e.g. https://demo.idemeumlab.com/saml/slo)$SigningCert- this is a Public X509 certificate that you obtained in the prerequisites section$IssuerUri- this is an Identity Provider Entity ID that you ontained in the prerequisites section$Protocol- protocol to use for federation. In our case it is SAMLP.
- Here is how we will execute the command in Powershell. Copy the command and replace variables with your own values obtained in the prerequisites section.
$Domain="idemeumlab.com"
$BrandName="idemeum"
$LogOnUrl="https://demo.idemeumlab.com/saml/signon"
$LogOffUrl="https://demo.idemeumlab.com/saml/slo"
$SigningCert="MIIC9DCCAdygAwIBAgIISmBJfnaJpLowDQYJKoZIhvcNAQELBQAwOjEMMAoGA1UEBhMDVVNBMRIwEAYDVQQHEwlQYWxvIEFsdG8xFjAUBgNVBAMMDSouaWRlbWV1bS5jb20wHhcNMjExMDA3MjMxMDM3WhcNMzExMDA1MjMxMDM3WjA6MQwwCgYDVQQGEwNVU0ExEjAQBgNVBAcTCVBhbG8gQWx0bzEWMBQGA1UEAwwNKi5pZGVtZXVtLmNvbTCCASIwDQYJKoZIhvcNAQEBBQADggEPADCCAQoCggEBAI6j9q+pHu06mNwEuVkGHO0ICIsPS5rRz2P0S+qG6jOVC2IWq9dxMZ3VLaWz75fFm0pbTWLahDTVblO5ueZLmpDTW/K2cbA3A7Ps08rb/Bae8sCGkx5LHBxpuOAEXXwoOY8Xvd2Oy1UyyqjimwhbF9+Ntcl3cAR5pPSqKWz0XjRHQnBpf7uIa77SVZJy7HMg7KmUAnFubtKJuulxBvz48RQJnc/oyYOzLRqo4gRRyxIkqxjT/0kcgQBUq8uy+7ZCF1N9gF8WLc0V6tURGnDYcEmPpPLUAR9RKImWEtHbwyLWhlHBzfRvQW96b7AFMudUCOitzHnl+fTDsKbHcvkQRAUCAwEAATANBgkqhkiG9w0BAQsFAAOCAQEAfGGe6aZzpfAjyvEV9zuasHLCdQGcdE1Ajm8MQXmM0GaxFr0D/rE3d5aMvdcUqyCbW/jHN8mHsQZuOkCaxp4BxrV1Flp6tIzWc1MiLXlxzw8SOmbzzv8fJKEljnZxZMX+ci481EEcLQV98rK5Fo/RTON/cHBYFD6gUCGLQRj9OnzgrXzLwlozgsRPaBJpl9CGkr4WJf5cxMbzFNWP2NBj50pd9085IXSY06uLlAuSPZnqpE7Fz09oSdzYjIPASA14L5SybanD8/vEFeFA8FDOEu6vF0DXO+VridrlAbI8kq9LuCOjmrE0PVtImQjwuTR28xPZgL1MQAmRYoFMUATJOA=="
$IssuerUri="https://demo.idemeumlab.com/api/saml/metadata"
$Protocol="SAMLP"

Set-MsolDomainAuthentication -DomainName $Domain -FederationBrandName $BrandName -Authentication federated -PassiveLogOnUri $LogOnUrl -SigningCertificate $SigningCert -IssuerUri $IssuerUri -LogOffUri $LogOffUrl -PreferredAuthenticationProtocol $Protocol- Verify that the settings are successfully configured for your domain.
Get-MsolDomainFederationSettings -DomainName <your domain here> | format-list *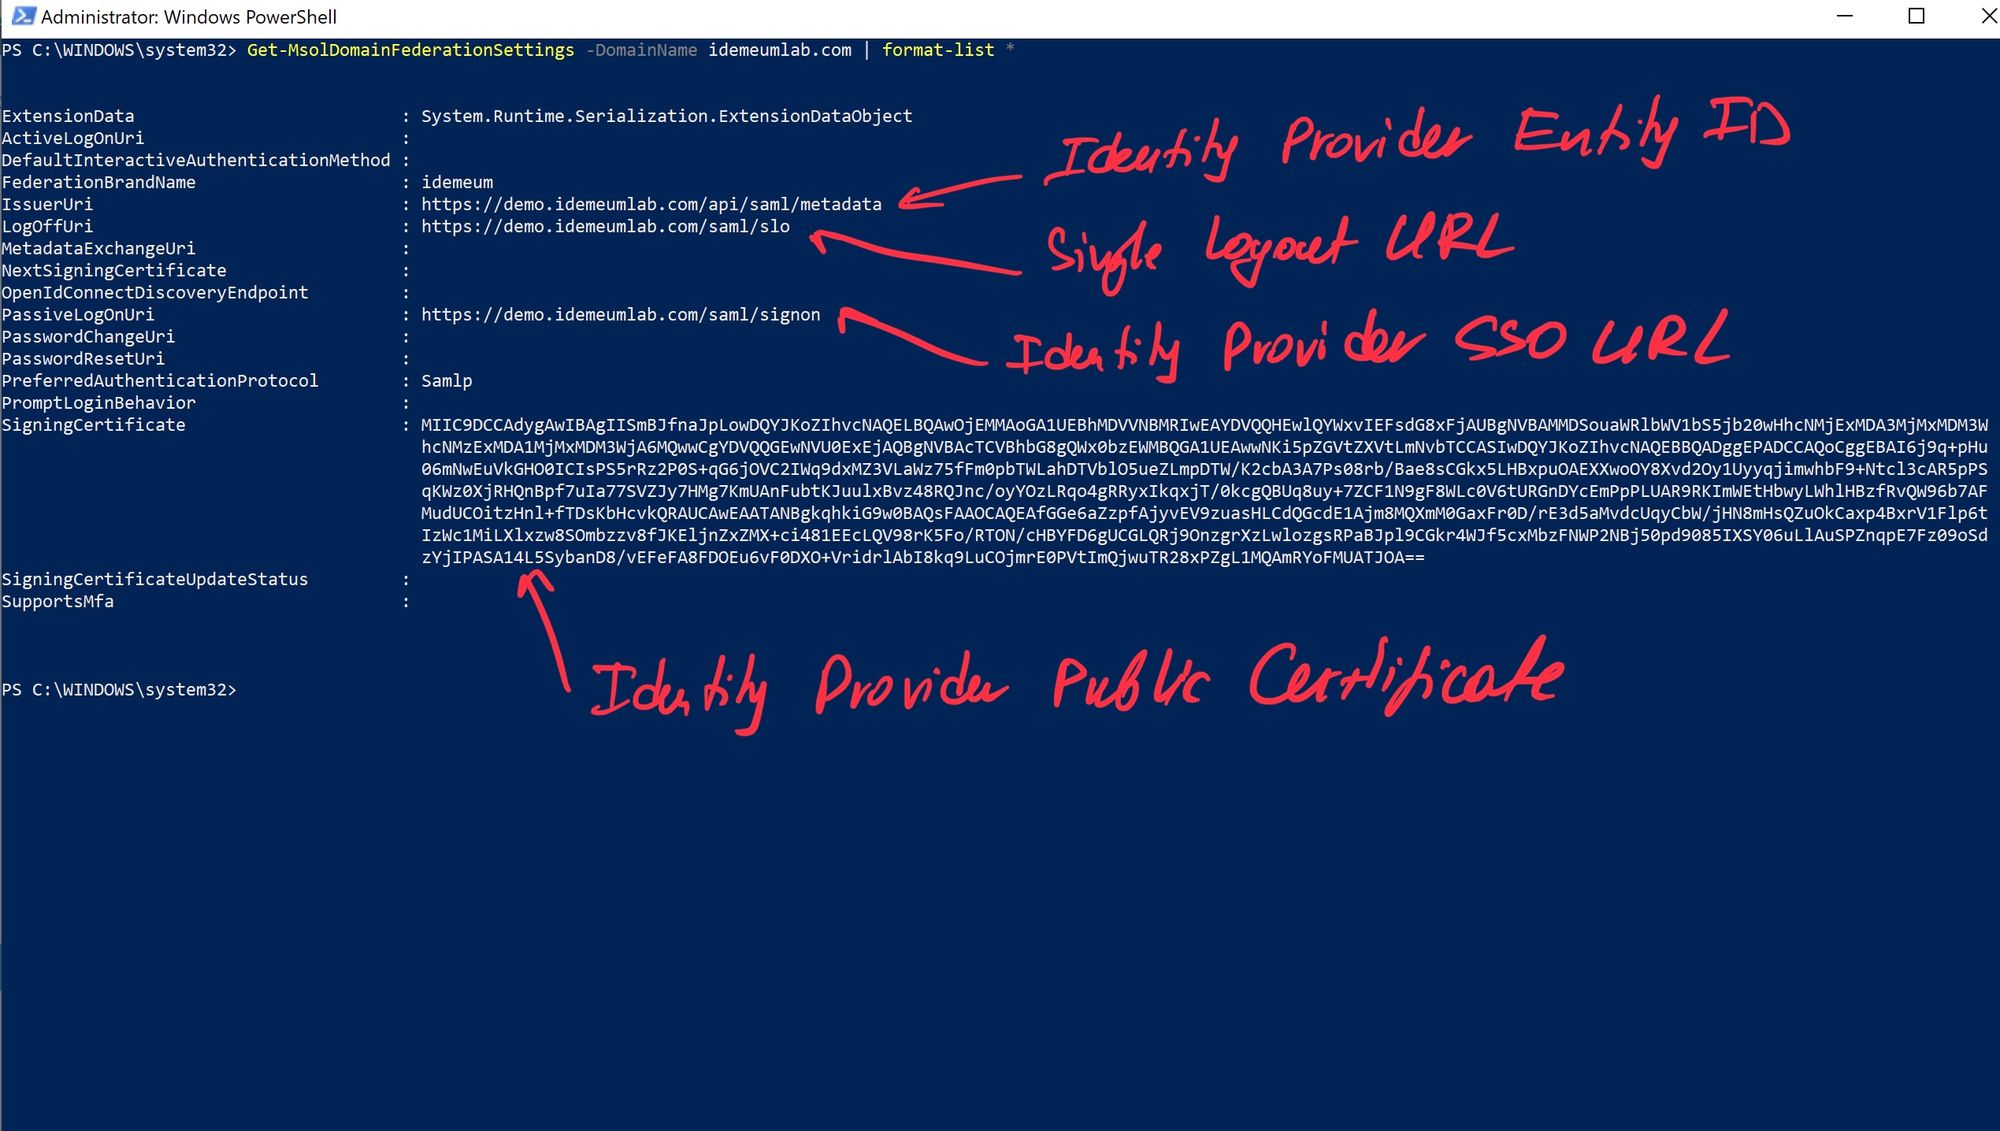
Configure SSO in idemeum
- Navigate to your idemeum admin portal at
https://[your domain].idemeum.com/adminportal - Click Applications in the left menu
- Search for Office 365 application and click Add App
- Click SAML at the top navigation menu
O365 is already pre-configured. All you need to do is to click Save.
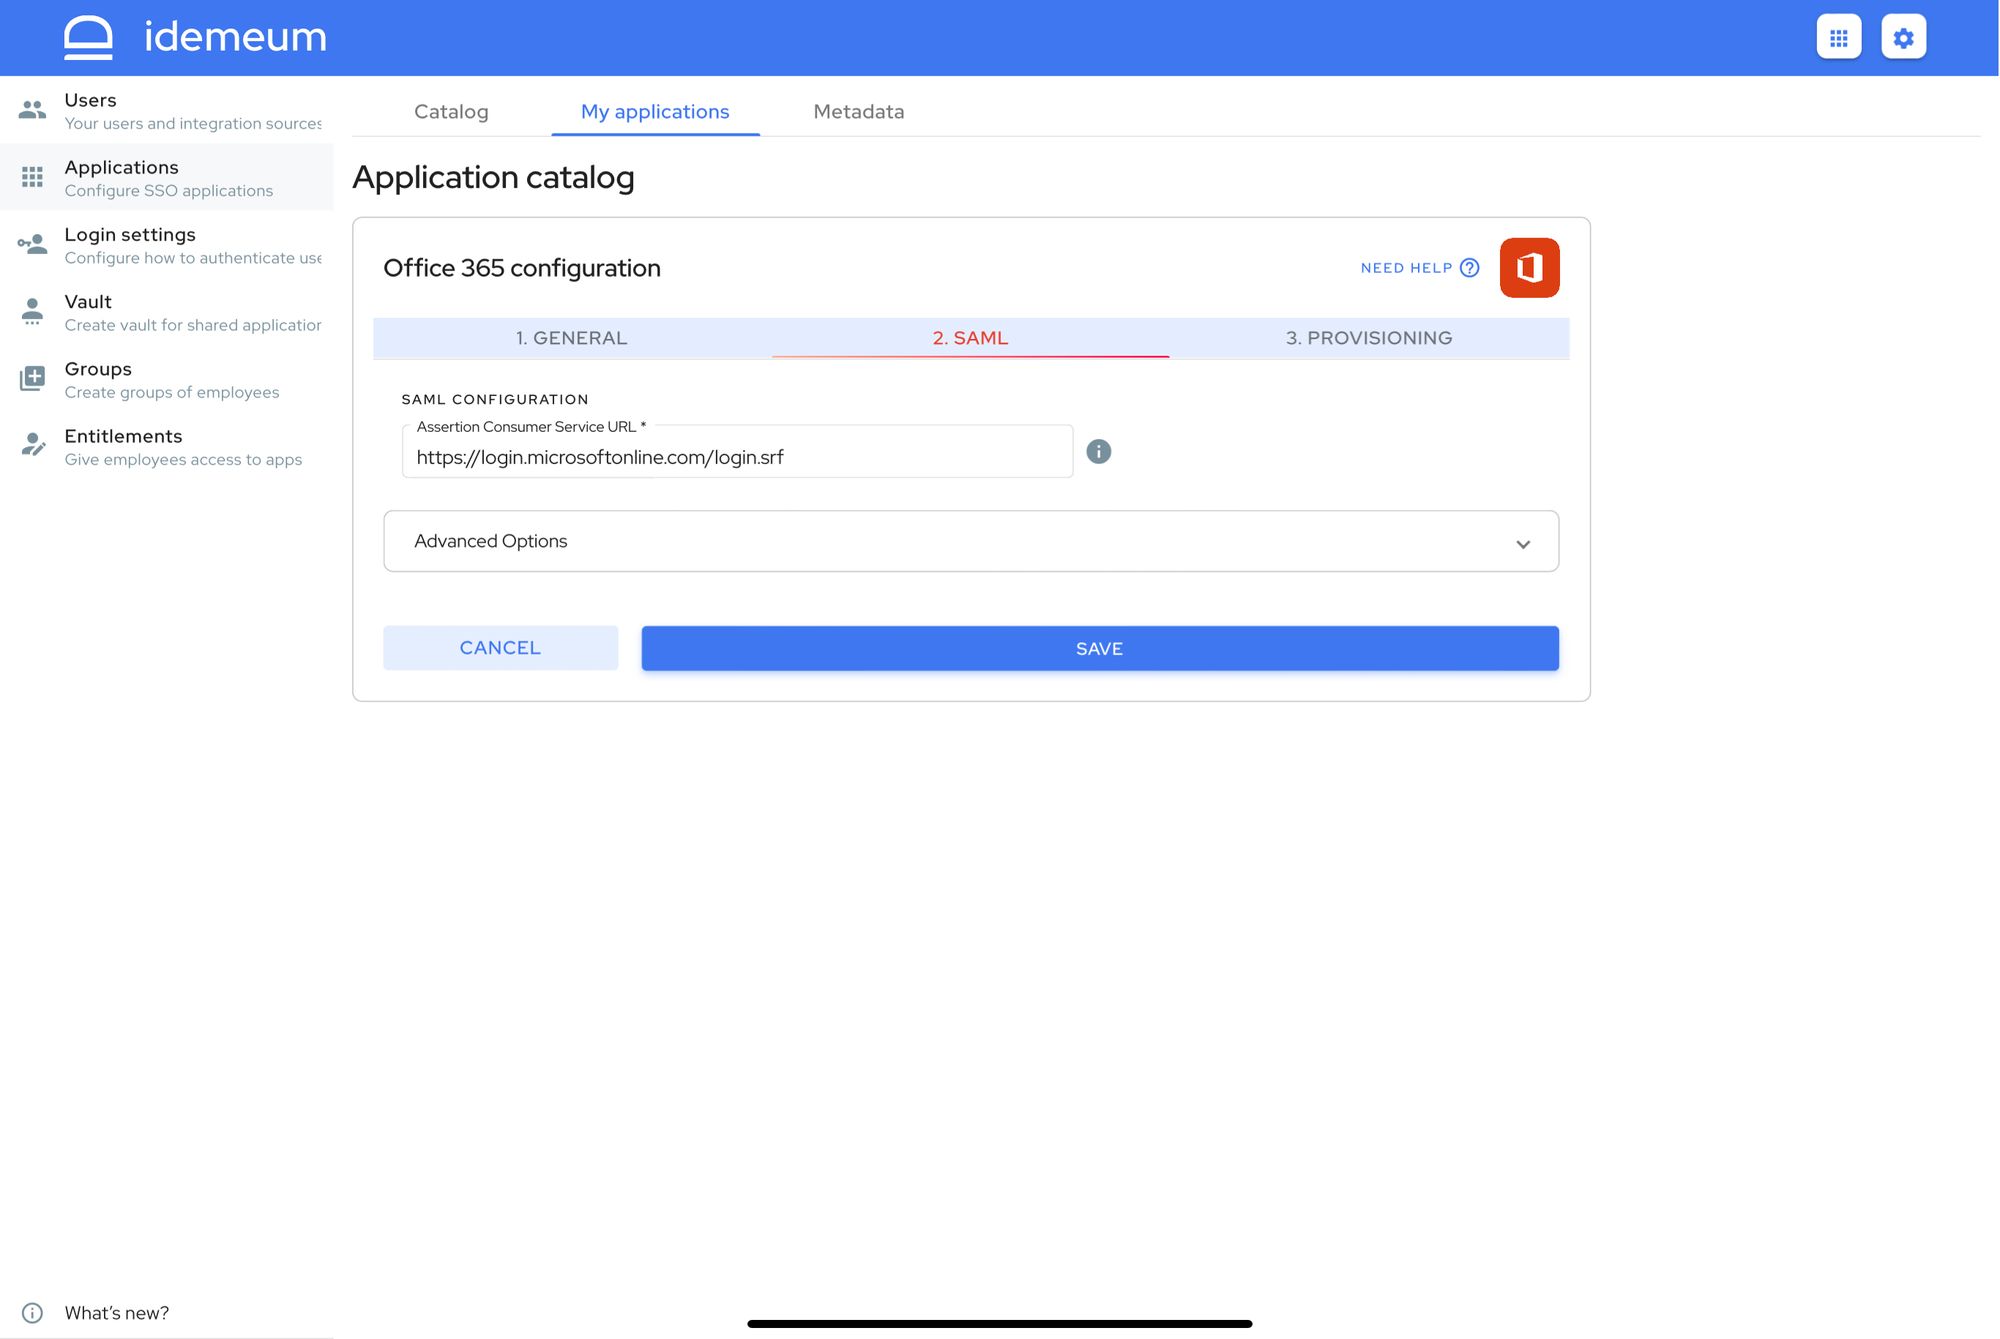
- Click Save
Automated provisioning
idemeum will automatically provision users and assign necessary licenses to them.
- Navigate to idemeum admin portal and access Microsoft 365 application
- Click Provisioning
- First Authorize idemeum to have access to Microsoft APIs. There will be a pop up to enter credentials and allow access.
- Upon successful authroization you will be able to see green checkbox and then you will be able to choose licenses to assign to newly provisioned users.
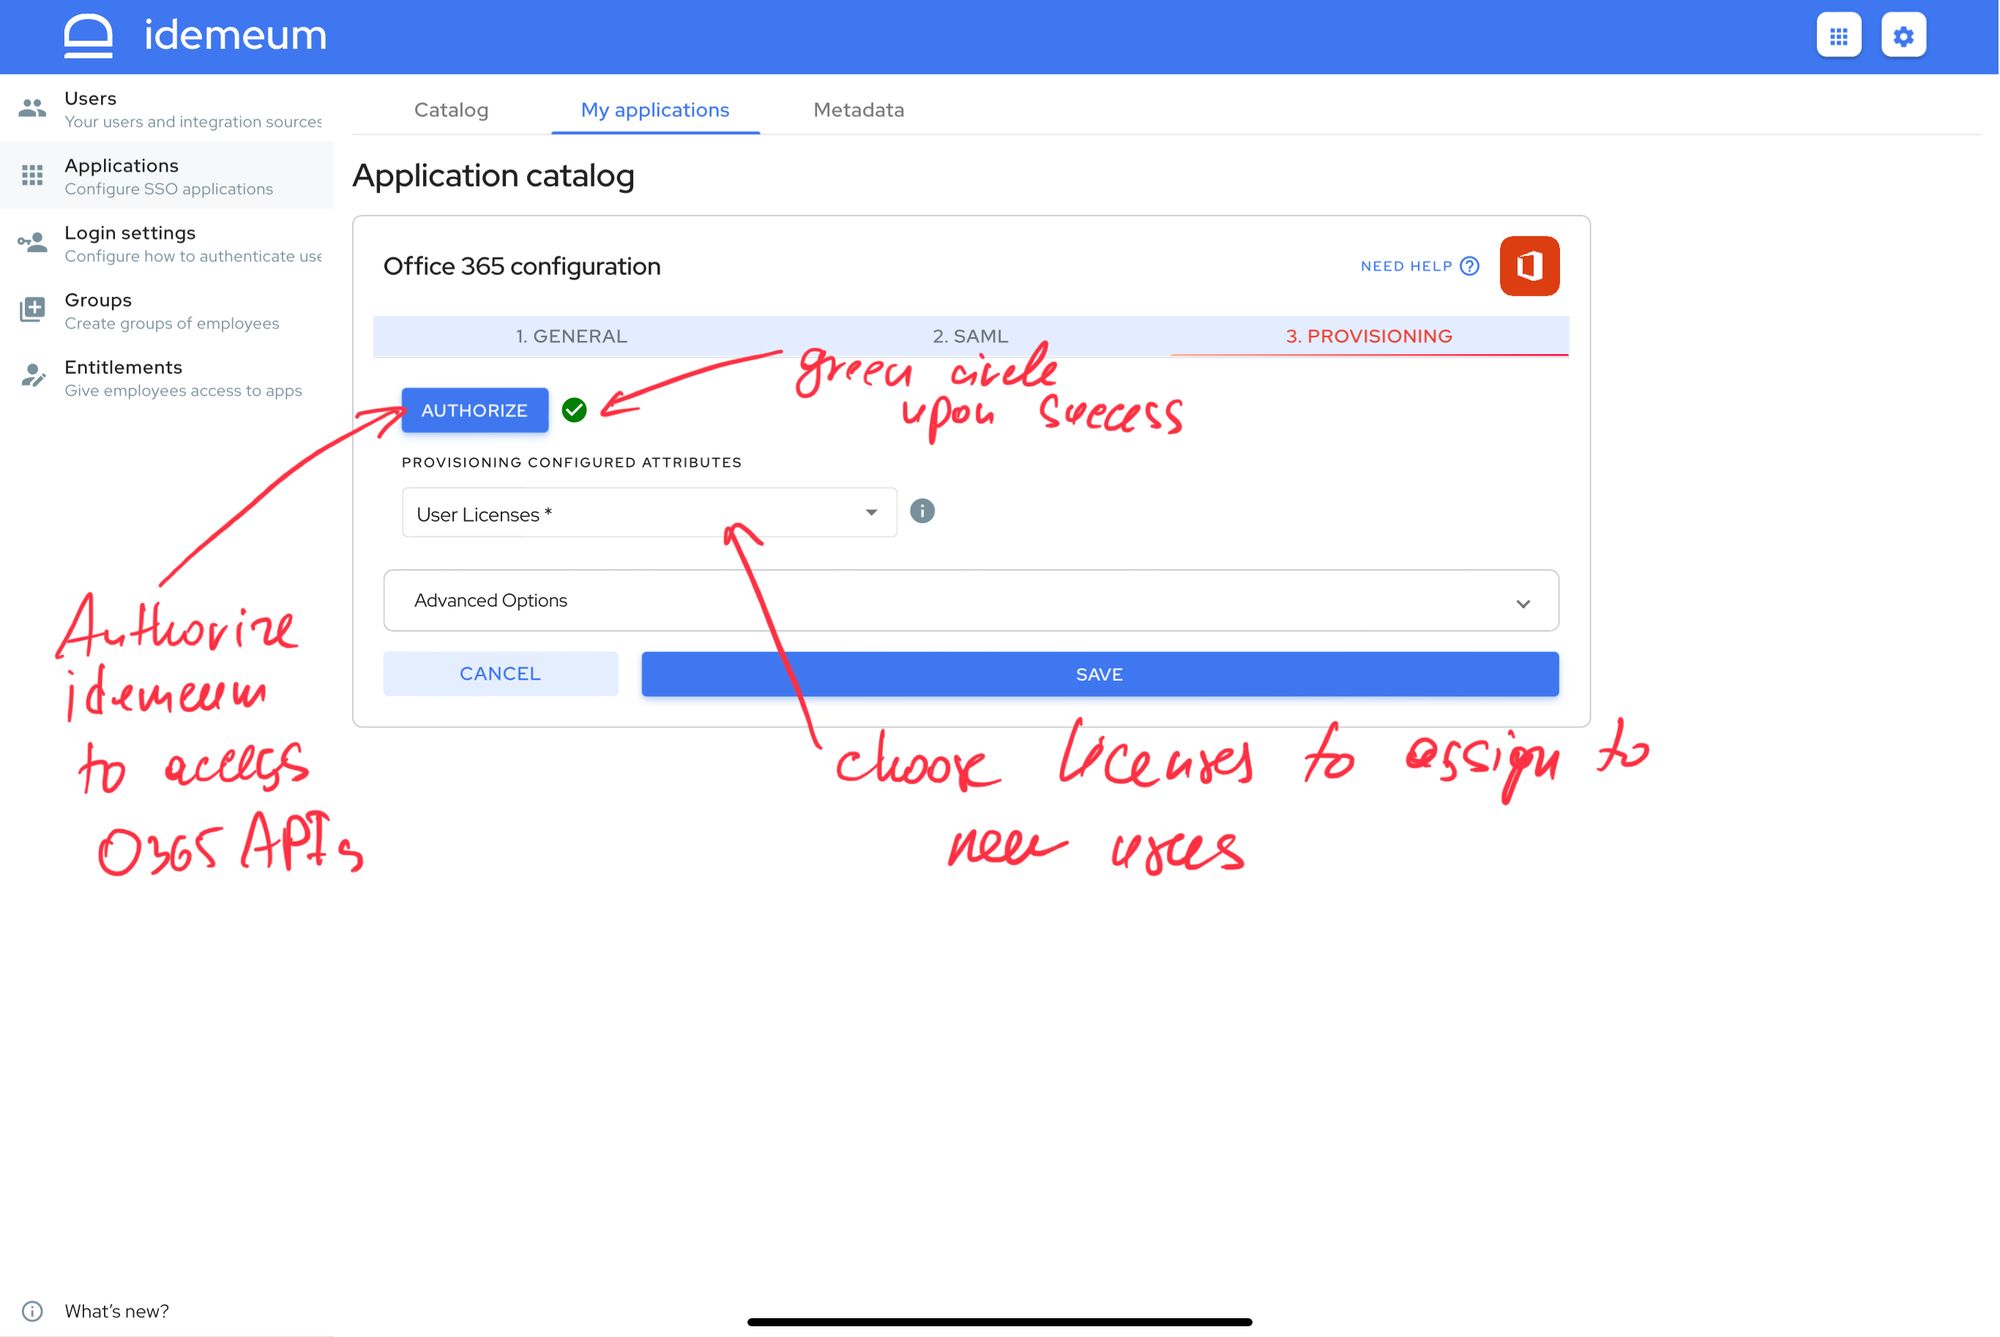
- Click Save
Application entitlements
Before users can access applications you need to make sure you entitle applications to them. In idemeum admin portal navigate to Entitlements section to assign applications to your employees.
SAML SSO login flows
Office 365 supports both:
- IDP Initiated Flow
- SP Initiated Flow
IDP Initiated flow
With this flow users first navigate to idemeum user catalog and then click on O365 icon to launch application.
SP Initiated flow
With this flow users can directly go to Office 365 and login with passwordless SSO.
- Open browser window and navigate to
portal.office.com - Enter the email address of the account that you would like to sign into. Once you do that you will be redirected to idemeum for login.